

Hager 790-909 Continuous Hinge, Stainless Steel Full Surface Swing Clear

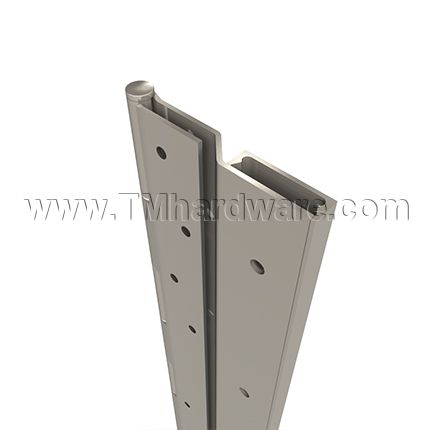


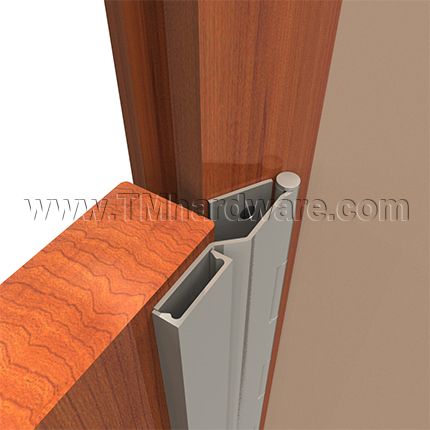

Hager 790-909 is a Heavy-Duty, Full Surface Stainless Steel Continuous Barrel Hinge which is mortised to the surfaces of the door and door frame with swing clear action. Designed for beveled or square edged doors 1 3/4" thick and up to 600 pounds. Compatible with beveled or square edged doors of any material and is available in a choice of lengths and finishes.
PRICED PER PIECE - See full product details and specs in the tabs below
See tabs below for additional information
Hager 790-909 Continuous Barrel Type, Stainless Steel Half Full Surface Leaf Hinge for 1 3/4" doors with security molding by Hager companies.
- Available in five sizes: (chart) For 119" Length, please contact us or call 845-388-1200 as Freight Shipping Charges may apply.

- Security and Privacy: Eliminates the gap between the frame and door so doors cannot be pried open, offers privacy on hospital and toilet partitions.
- Finish: Stainless steel continuous hinges are brushed to a satin finish (US32D). For custom color painted or powder coated finishes please contact our office at 845-388-1200 or contact us (Color samples are required for matching.)
- Materials: Constructed from 14 Gauge Type 304 Stainless Steel with lubricated nylon 6/6 bearings between each knuckle and stainless steel pin. 1/4" diameter Stainless Steel Pin.
- Features: Heavy-duty construction to support doors up to 600 pounds. Energy saving, creates a seal from the top to bottom of the door to prevent air infiltration and permanent weather barrier. Useful for ADA upgrade work.
- Design: Full Surface leaf hinge for 1 3/4" thick door with security molding. Provides 1/8" door inset. (see Product Data Tab.)
- Fasteners: #10-24 X 5/8" S/S Dril-Kwik (R) (metal frame)
#1/4-20 X 3/4" 2C Dril-Kwik (R) (metal door)
#1/4-14 X 1 2C Type AB (wood frame)
- Applications: May be used for beveled or square edge doors. Frame face must have a flat surface at least 1 7/8" wide. Corrosion resistant for swimming pool buildings, sewage, water treatment plants and salt spray environment. Ideal for applications where doors and frames are subjected to severe abuse such as hospitals and institutions.
- Clearance: Minimum clearance between the hinge edge of the door and the frame is 1/8" plus standard lockside clearance.
- Reinforcement: No door or frame reinforcement required up to 200 lbs. Heavier weight use 16-gauge channel.
- Fire-Rating: Up to 3 hour metal and 90 min. wood composite (with studs).
- Certification: ANSI A156.26 Grade 1 for 150 pound doors.
- Additional Options: Including security studs, specialty fasteners, hospital tip and customize hole patterns may be ordered, for details and pricing please contact us or call our office at 845-388-1300.
- Installation: Installed either with or without reinforcements depending on door weight. Installation screws are provided (see Installation Tab.) The frame face must have a flat surface at least 1 5/8" wide.
- Priced per piece
- Please note, images are for illustrative purposes only. They are not actual photos. Therefore, actual colors may vary slightly and size may be enlarged to show detail. See product specs for exact measurements.
Click here to view our Hager 790-911 Continuous Hinge, Stainless Steel Concealed Leaf Swing Clear.
This product has a lifetime warranty against defects in workmanship and material.
Click here to view our Full Warranty Policy.
Printable Documents: |
|
Click to print Hager 790-909 Continuous Hinge 79" Template. Click to print Hager 790-909 Continuous Hinge 83" Template. Click to print Hager 790-909 Continuous Hinge 85" Template. Click to print Hager 790-909 Continuous Hinge 95" Template. Click to print Hager 790-909 Continuous Hinge 119" Template. Click to print Hager Continuous Hinge Electric Modification Information. |
Product Specs: |
 |
| Click to print Installation Instructions for Hager 790-909 Continuous Hinge. |
| Hager Model 790-909 is a Stainless Steel Continuous Full Surface Hinge for 1 3/4" thick doors. The frame face must have a flat surface at least 1 7/8" wide. Recommended clearance between the hinge edge of the door and the frame rabbet is 1/8". |
Hinge Length: |
| All Hager Stainless Steel Continuous Hinges are supplied 7/8" to 1" shorter than the nominal door height to avoid threshold or carpet clearance problems. If the hinge must be trimmed shorter, first determine the correct hand of the door and orientation of the hinge. Remove the bottom pin cap and trim from the bottom of the hinge only to achieve the desired length - do not cut the top end. Undercut the pin 7/8" shorter for clearance and reinsert the bottom pin cap. |
General Fitting Procedure: |
|
Frame Preparation: |
|
1. The frame face must have a flat surface at least 1 7/8" wide to support the hinge. Mark a line on the frame face 1/2" from the frame rabbet. This will be the centerline for the first column of fasteners on the frame leaf of the hinge. 2. With the hinge open, position the frame leaf into position on this mark, with the top of the hinge positioned 1/8" below the level of the header rabbet. 3. Mark and center punch the screw hole locations. Accurate location is important for proper installation. 4. For metal frames 14 gauge or less, it is not necessary to pre-drill pilot holes if using the #10 self-drilling screws provided. For metal frames 12 gauge and over, drill and tap all mounting holes for #10-24 threads prior to installing the screws. For wood frames, pre-drill pilot holes using a #25 bit. 5. Attach the hinge to the frame. For metal frames, use the #10 self-drilling screws provided (recommended driver speed (1,900-2,500 RPM). For wood frames, use optional #10 wood screws. |
Hanging the Door: |
|
1. With the hinge open, set the door into the frame. Shim the door into the proper position. Provide 1/8" clearance between the top of the door and the frame header, and 1/8" between the door and the frame on each side. 2. With the door held securely in place, rotate the hinge leaf into position on the face of the door: a. For metal doors, mark and center punch the hole locations on the door face. For metal doors 12 gauge or less it is not necessary to pre-drill pilot holes if using the 1/4" self-drilling screws provided. For thicker metal doors, pre-drill pilot holes using a 7/32" bit. Install the 1/4" self-drilling screws provided (recommended driver speed 1,90--2,500 RPM), placing a Molding Clip under the head of a screw at five locations along the hinge - one at each end and the others spaced equally in between. b. For wood doors, mark and center punch the hole locations on the door face. Pre-drill pilot holes using a 7/32" bit. Install the #14 wood screws, placing a Molding Clip under the head of a screw at five locations along the hinge - one at each end and the other spaced equally in between. c. (Optional Sexbolt Mounting) - Locate a sexbolt at each end hole, with the others spaced equally in between. (Note: There are more holes in the hinge than required. Use a minimum of 10 sexbolts.) Mark and center punch only the hole locations where a sexbolt will be inserted. Rotate the hinge leaf back out of the way. At each mark, drill a hole completely through the door using a 1/4" bit. For the 'push' face of the door, at each hole location, bore 1-1/4" deep using a 3/8" bit. Do not bore completely through the door. Rotate the hinge leaf into position on the face of the door. Insert the sexbolt posts from the 'push' side of the door and the screws from the 'pull' side. When inserting the screws, place a Molding Clip under the head of a screw at five locations along the hinge - one at each end and the others spaced equally in between. 3. Remove all shims and wedges and make a gentle trial swing. Carefully check the door for proper swing and clearance. |
Install the Snap-On Molding: |
| 1. Position the Molding so that the short leg is closest to the hinge pin. Hook the short leg over the Molding Clips along the full length of the hinge. Starting at the top and working downward press the long leg of the Molding in place completely over the outside edge of the door leaf. If necessary, gently tap in place using a rubber mallet, taking care not to damage the Molding. |