

Markar FS3502 Stainless Steel Security Hinge, Flush Full Surface

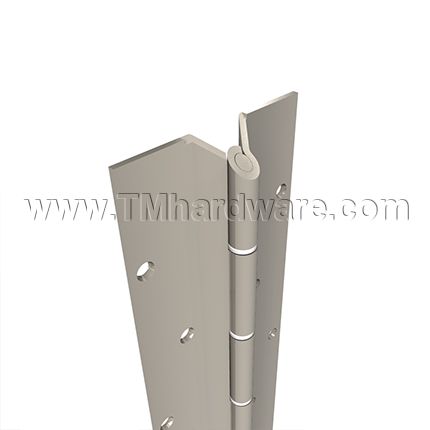

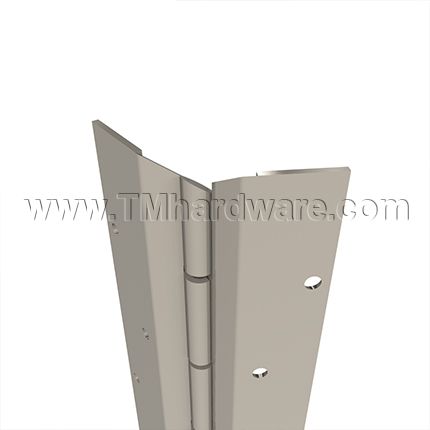
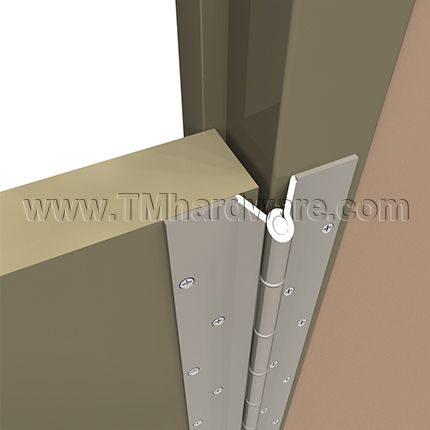


Markar FS3502 is a Heavy-Duty Flush Full Surface Leaf Continuous Hinge which is attached to the surfaces of the door frame and door. This hinge is designed for door weighing up to 900 lbs. and a maximum width of 4'0". Hinge is Satin Stainless Steel and available in standard stock sizes, see below for details.
PRICED PER PIECE
See tabs below for additional information
Marker FS3502 is a Pin and Barrel Type Continuous Stainless Steel Flush Full Surface Leaf Hinge
-
Standard Sizes: 6'8", 7'0", 7'2", 8'0", 10'0". Custom sizing available, contact us or call at 845-388-1300 for details and pricing.
-
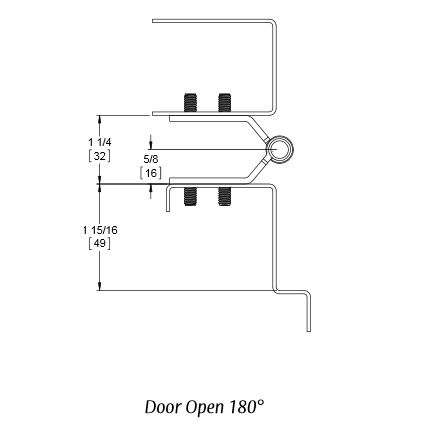
Applications: Supports weights up to 900 lbs. 4'0" maximum door width, 2" thick maximum door thickness. Non-handed. Extra heavy duty for high traffic, high abuse door applications, including correctional facilities, high security locations and extra heavy doors.
-
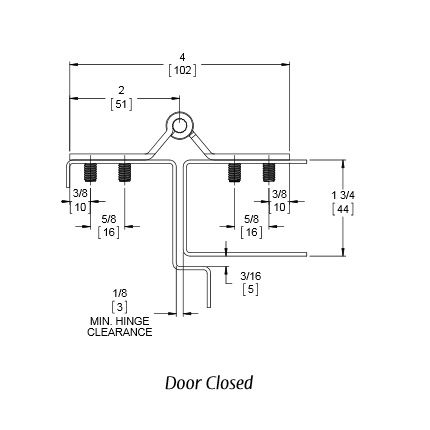
Design: Constructed from 12 gauge 304 stainless steel (US32D).187" diameter 304 stainless pin with hinge pin cap and medical bearings. Each knuckle 2", including split nylon bearing at each separation for a quiet, smooth, self-lubricating operation. Designed to solve door sag problems on high traffic, high abuse areas.
-
Finish: US32D Satin Stainless Steel (630). Custom finishes are available, contact us or call at 845-388-1300 for details and pricing.
-
Mounting Hardware: Custom 12-24 x 7/16" S.S. Phillips Flat Head Undercut Machine Screw.
-
Handing: Not required on standard hinges. Specify handing when ordering a hinge with modification.
-
Certifications: Fire-Rating: 3 hours on hollow metal doors. 90 minutes- hollow metal and composite. 20 minutes- wood door.
Classified in accordance with UL10C for positive pressure.
ANSI/BHMA Standard A156.26 Grade 1
Note: Fire label for doors and frames should be placed on the header and top rail of fire rated doors and frames.
-
Modifications and Options: Adjustable monitoring switch, hospital tip hinges, medical bearings, dutch door hinge preparation, custom hole patterns, special sheared leaf, wide throw hinges, raised barrel(Swage), edge guard hardware cut-outs, special length hinges, Electrical Modification Access Prep, CTP-Current Transfer Preparation, CE - Current Transfer-Concealed, CT- Current Transfer- Contact Switch, ES-Exposed Monitoring Switch, Blank Hinges (Minus Hole Pattern), Lead Lined Cover (1/16" LEAD), Security Fasteners are available through our office. For details and pricing please contact us or call 845-388-1300.
-
Priced per Piece
- Please note, images are for illustrative purposes only. They are not actual photos. Therefore, actual colors may vary slightly and size may be enlarged to show detail. See product specs for exact measurements.
Click to view our Markar HG3505 Hinge Guard Security Continuous Hinge.
This product has a 25 year warranty against defects in workmanship and material.
Click here to view our Full Warranty Policy.
Printable Documents: |
|
Click to print Markar FM3502 Continuous Hinge Product Specs. |
Product Specs: |
  |
Certifications: |
 |
|
Click here to print Installation Instructions for Markar FS3502 Continuous Hinge. Click here to print Installation for Markar Continuous Hinges Using Adjustable Screws. |
General Installation: |
|
All holes in the hinge must be drilled correctly and fasteners properly installed. Failure to use the fasteners supplies by Markar Architectural Products, Inc. will void the UL or WHI fire rated listing. |
Hinge Installation: |
|
1. Place the hinge on the frame as shown in Figure 1. Allow 1/8" between the top of the hinge and the underside of the header. Note that at least 1 13/16" of the frame face is required for mounting this hinge. Hospital tips should be mounted on the top of the door. 2. Mark the position of the top and bottom holes with a center punch. The use of the Markar MT-806 center punch can help center the hole so that the fasteners will enter straight. The taper on the tool sits in the countersunk hole on the hinge. Make sure the hinge is straight. 3. Drill the holes with a #16 drill. 4. Tap the holes for a 12-24 thread. 5. Attach the hinge to the frame using the 12-24 x 1/2" Phillips flat head undercut machine screws. 6. After the top and bottom screws are secure, repeat steps 2,3,4, and 5 for the balance of the holes on the frame leaf. 7. Fold the door leaf back over the frame leaf and place the door into the opening. Place shims under the door to provided 1/8" clearance between the frame and the top of the door. Add shims at both the hinge and latch side of the door so that there will be 1/8" clearance between the door and frame on the lock side. 8. With the door firmly in place, return the door leaf to the face of the door and repeat the drilling procedure described in steps 2 through 5. 9. Open the door and check for proper swing. 10. Fasten the rest of the screws by repeating steps 2 through 5. Machine screws with Torx driver heads are an option. |