

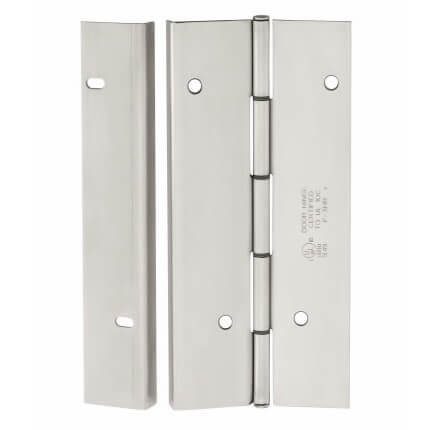
Markar HG305 Stainless Steel Hinge, Full Mortise with Adjustable Hinge Guard


If QuickShip logo is displayed near price, this product is in stock, ready to ship! Factory lead times will apply to options that do not display the QS Logo.
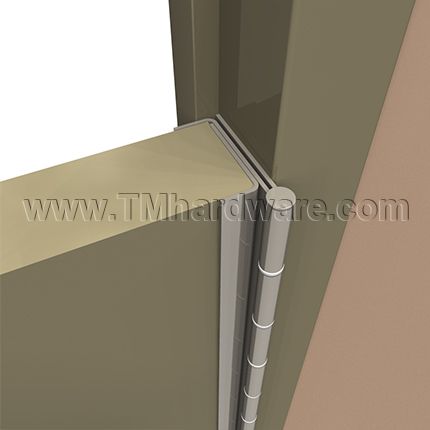
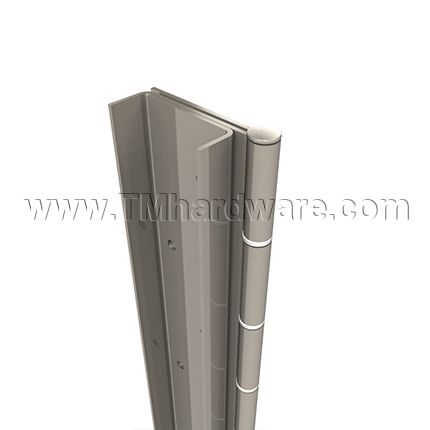
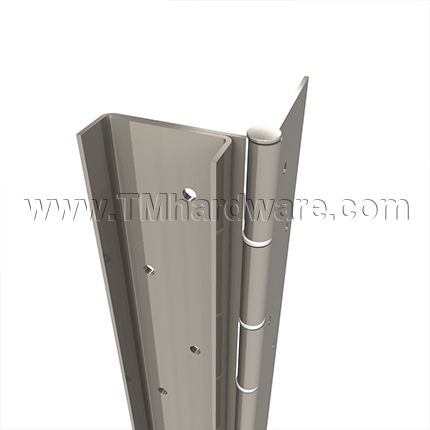
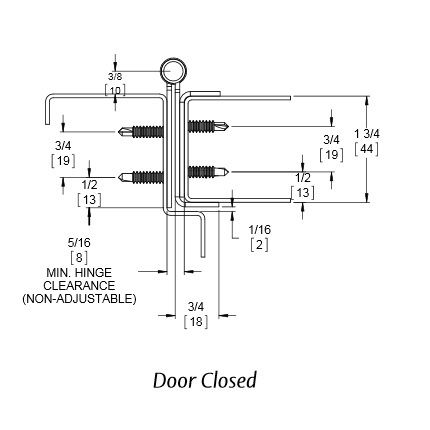
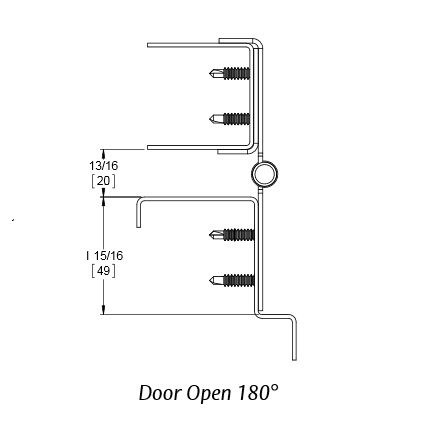
Markar HG305 is a Heavy-Duty Concealed Leaf Continuous Hinge which is mortised to the frame rabbet and edge of the door with wrap around edge guard to protect the door. This hinge is designed for door weighing up to 600 lbs. and a maximum width of 4'0". Hinge is Satin Stainless Steel and available in standard stock sizes, see below for details.
PRICED PER PIECE
See tabs below for additional information
Marker HG305 is a Pin and Barrel Type Continuous Stainless Steel Concealed Leaf Hinge with Wrap-around Edge Guard.
- Standard Sizes: 6'8", 7'0", 7'2", 8'0", 10'0". Custom sizing available, contact us or call at 845-388-1300 for details and pricing.
- Applications: Supports weights up to 600 lbs. 4'0" maximum door width. Extra heavy duty for high traffic, high abuse door applications, including correctional facilities, high security locations and extra heavy doors. The wrap-around edge guard protects the door from unsightly dents and gouges and will deflect objects, preventing further damage.
- Design: Constructed from 14 gauge 304 stainless steel (US32D), .187" diameter 304 stainless steel pin (rod) with medical bearings and stainless steel end pins. Built in hinge guard protects the door from dings and gouges from carts and gurneys while providing clean lines and aesthetic appearance. Each knuckle 2", including split nylon bearing at each separation for a quiet, smooth, self-lubricating operation. Fasteners concealed when door is closed.
- Finish: US32D Satin Stainless Steel (630). Custom finishes are available, contact us or call at 845-388-1300 for details and pricing.
- Mounting Hardware: Custom 12-24 x 11/16" S.S. Phillips Flat Head Undercut TEK Screws.
- Handing: Specify Handing when ordering hinge. Select handing from options above. Not sure what handing is required for your door? See How to Determine Handing / Swing of Door.
- Certifications: Fire-Rating: 3 hours on hollow metal doors. 90 minutes- hollow metal and composite. 20 minutes- wood door.
Classified in accordance with UL10C for positive pressure.
Evaluated in accordance with TAS 201-94, TAS 202-94, TAS 203-94, ASTM E330, ASTM E1886, ASTM E1996 and ANSI A250.13.
ANSI/BHMA Standard A156.26 Grade 1.
Constructed in accordance with Guidelines FEMA 320 and FEMA 361.
Note: Fire label for doors and frames should be placed on the header and top rail of fire rated doors and frames.
- Modifications and Options: Adjustable monitoring switch, hospital tip hinges, medical bearings, dutch door hinge preparation, custom hole patterns, special sheared leaf, wide throw hinges, raised barrel(Swage), edge guard hardware cut-outs, special length hinges, Electrical Modification Access Prep, CTP-Current Transfer Preparation, CE - Current Transfer-Concealed, CT- Current Transfer- Contact Switch, ES-Exposed Monitoring Switch, Blank Hinges (Minus Hole Pattern), Lead Lined Cover (1/16" LEAD), Security Fasteners are available through our office. For details and pricing please contact us or call 845-388-1300.
- Priced per Piece
- Please note, images are for illustrative purposes only. They are not actual photos. Therefore, actual colors may vary slightly and size may be enlarged to show detail. See product specs for exact measurements.
Click to view our Markar HG306 Pin and Barrel Half Surface Hinge.
This product has a 25 year warranty against defects in workmanship and material.
Click here to view our Full Warranty Policy.
Printable Documents: |
|
Click to print Markar HG305 Continuous Hinge Product Specs. |
  |
Certifications: |
 |
| Click to print Installation Instructions for Markar HG305 Pin and Barrel Hinge. |
General Information: |
|
All holes in the door and frame must be drilled correctly and fasteners properly installed. Failure to use the fasteners supplied by our manufacturer will void the UL or WHI fire rated listing. The Universal Screw Pack contains sheet metal, machine and self-drilling screws. This allows various installation options. If mounting to a wood frame or an unreinforced hollow metal door and frame, follow option A in the instructions. Follow option B if the frame is reinforced or at least 1/8" thick. If you use the self-drilling Tek screws (recommended for grout filled frame and unreinforced hollow metal door), follow option C. If using the AdjustaScrews (available through our office) to mount to a wood door, follow option D in the instructions, otherwise follow option E if the door is reinforced or at least 1/8" thick. Perform each step of these instructions, unless specifically labeled A, B, C, D or E. |
Installation: |
|
1. Place the hinge on the frame as shown in Figure 1 on the other side of these instructions. Allow 1/8" between the top of the hinge and the underside of the header. Place the hinge tightly against the stop of the frame. Clearance is built into the hinge. Hospital tips on hinges should be placed on the top of the door. 2. Mark all the hole locations on the door jamb with the hinge held firmly in place. 3. Center punch each hole. The use of the Markar center punch can help center the hole so that the fasteners will enter straight. The taper on the tool sits in the countersunk hole on the hinge. 4. Using a #25 bit, for instructions A and B, drill all the frame holes. For instructions C, drill only the top and bottom holes in the frame. 5. B. Tap the holes for a 10-24 thread. Do not install the hinge to the frame at this time. 6. Place the hinge on the edge of the door. Carefully line up the hinge with the top of the door. Check handing. 7. Mark all the hole locations on the door with the hinge held firmly in place. 8. Center punch each hole. A drill may be used to spot these holes while the hinge is in place. Note that accurate location is important for proper hinge installation. 9. Remove the hinge. For instructions A and B: drill each hole with a #25 bit. For instructions C, drill only the top and bottom holes with a #25 bit. For instructions D and E, drill each hole with a 5/16" bit to a minimum depth of 1 3/8". Make sure that the door is properly reinforced to accept the AdjustaScrew. This option cannot be used on inadequately reinforced doors. For instructions E, then tap the holes for a 3/8-16 thread. 10. D and E: Insert AdjustaScrews into every hole. Place a 3/16" Allen wrench in the opening of the AdjustaScrew and simply turn the AdjustaScrew into the hole while keeping the screw properly aligned. Drive all AdjustaScrews in until it is approximately flush with the edge of the door. Note that it is not necessary to tap the holes in wood doors since AdjustaScrews cut their own threads. Do not be concerned with the tight fit. AdjustaScrews are designed for a tight friction fit in the tapped holes so that they will not turn when attachment screw is being tightened. If the AdjustaScrews turn too freely, apply LoctiteTM for threaded joints to the screw threads during installation. A screw gun or variable speed electric drill with a Markar hex driver bit provides a faster means of installing the AdjustaScrews. 11. Place the hinge on the door.
12. For instructions A: Attach the hinge to the door using #10 x 1 1/4" flat head undercut sheet metal screws. 13. Attach the door and hinge to the frame, A: using #10 x 1 1/4" flat head undercut sheet metal screws. B: using 10-24 x 3/4" flat head undercut machine screws. C: using self-drilling Tek screws. 14. For instructions D and E: Close the door and check alignment.
PRODUCT MUST BE INSTALLED ACCORDING TO ALL APPLICABLE BUILDING AND LIFE SAFETY CODES. |