

Roton 780-113HD Continuous Hinge, Concealed Leaf Safety Hinge


ROTON 780-113HD is a Heavy-Duty Concealed Leaf Continuous Hinge which is mortised to the frame rabbet and edge of the door. Used as a Safety Hinge when installed without a frame stop. Compatible with sheet metal or wood door frames and is available in a choice of lengths and finishes.
PRICED PER PIECE - See full product details and specs in the tabs below
See tabs below for additional information
Roton 780-113 continuous geared, standard-duty concealed leaf hinge by Hager companies.
Available in five sizes: (chart) For 119" Length, please contact us or call 845-388-1200 as Freight Shipping Charges may apply.

Bearings: Spaced to distribute door weight evenly up to 200 pounds.
Finish: Clear anodized aluminum or dark bronze anodized aluminum. Custom colors are available, for details and pricing please contact us or call us at 845-388-1300.
Materials: Constructed from low temperature, corrosion resistant aluminum.
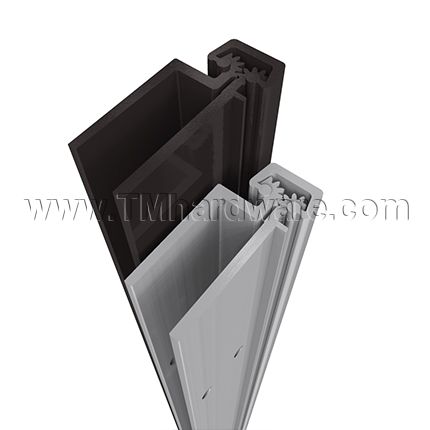
Design: Concealed leaf with door leaf alignment rib for proper hinge and door location. Leaves are mortised to the frame rabbet and door edge. (see Product Data Tab.)
Fasteners:
- #12-24 x 11/16" Flat Head Self-Drill Screws for metal doors.
- For installations requiring different screws or for additional quantities, please get in touch with us through our office to order
Applications: For wood or metal applications. "Safety Hinge" for kindergartens, nursing homes, daycares etc. when used without frame stop.
Clearance: Minimum clearance between the hinge edge of the door and the frame is 13/16" plus standard lockside clearance.
Reinforcement: No door or frame reinforcement necessary for loads up to 200 lbs. For heavier weight use 16 gauge channel.
Installation: Installed either with or without reinforcements depending on door weight. Installation screws are provided (see Installation Tab.)
Additional Options: Including specialty cover channels, top bearing, hospital tip and customize hole patterns may be ordered, for details and pricing please contact us or call our office at 845-388-1300.
Priced per piece
Please note, images are for illustrative purposes only. They are not actual photos. Therefore, actual colors may vary slightly and size may be enlarged to show detail. See product specs for exact measurements.
Click here to view our Roton 780-114HD Continuous Geared Concealed Leaf Hinge.
This product has a lifetime warranty against defects in workmanship and material.
Click here to view our Full Warranty Policy.
-
QuickShipNo
-
ManufacturerHager Companies
-
MPN780-113HD
-
Finish OptionsClear Anodized Aluminum (US28), Dark Bronze Anodized Aluminum (US10B)
-
Door TypeMetal Door (Standard), Wooden Door
Printable Documents:
Click to print Roton 780-113 Continuous Hinge 79" Template.
Click to print Roton 780-113 Continuous Hinge 83" Template.
Click to print Roton 780-113 Continuous Hinge 85" Template.
Click to print Roton 780-113 Continuous Hinge 95" Template.
Click to print Roton 780-113 Continuous Hinge 119" Template.
Product Specs:

Printable Documents:
Click to print Roton 780-113HD Continuous Hinge Installation Instructions.
General Information:
Roton Model 780-113 is an Aluminum Continuous Geared Concealed Leaf Hinge. Clearance required between the hinge edge of the door and the frame is 13/16". "HD" models have additional bearings and fasteners for heavy-duty application.
Hinge Length:
All Roton hinges are supplied approximately 1" shorter than the nominal door height to avoid threshold or carpet clearance problems. If the hinge must be trimmed shorter, first determine the correct hand of the door and orientation of the hinge. Then mark and trim from the bottom of the hinge only - do not cut from the top end.
General Fitting Procedure:
- For new construction with metal doors/frames: To accomodate the 13/16" hinge clearance required for this Roton model, order the door undersized or the frame header oversized. See the clearance information above to attain the proper size. Mortar guards, either styrofoam or wood, are recommended for frames to prevent grout form interfering with the installation of the hinge fasteners.
- For new site-hung wood doors: If necessary, scribe and cut from the latch edge of the door to leave sufficient hinge stile thickness for proper fastening. A minimum clearance of 13/16" is required between the hinge edge of the door and the frame. See the clearance information above to attain the proper finished width of the door.
- For remodeling with existing wood or laminate doors: If necessary, scribe and cut from the hinge edge of the door and plane smooth. A minimum clearance of 13/16" is required between the hinge edge of the door and the frame. See the clearance information above to attain the proper finished width of the door.
Frame Preparation:
1. With the hinge open, place the hinge frame leaf against the frame making certain that the hinge face is in line and flush with the frame face along its entire length. Position the top of the hinge 1/16" (1/8" maximum) below the header. Note: A 1/16" shim is recommended due to initial settling of the bearings.
2. Mark and center punch the screw hole locations. Accurate location is important for proper installation.
3. For metal frames 12 gauge or less, it is not necessary to pre-drill pilot holes if using the self-drilling screws provided. For metal frames greater than 12 gauge, drill and tap all mounting holes for #12-24 threads prior to installing the screws. For wood frames, pre-drill pilot holes, using a #18 bit for optional #12 wood screws.
4. Do not attach the hinge to the frame at this time.
Door Preparation:
1. With the hinge open, place the hinge door leaf against the edge of the door making certain that the alignment rib is flush against the door face along its entire length. Position the top of the hinge flush with the top of the door.
2. Mark and center punch the screw hole locations. Accurate location is important for proper installation.
3. For hollow metal doors 12 gauge or less, it is not necessary to pre-drill pilot holes if using the self-drilling screws provided. For metal doors larger than 12 gauge, drill and tap all mounting for #12-24 threads prior to installing the screws. For wood doors, pre-drill pilot holes using a #18 bit for optional #12 wood screws.
4. Attach the hinge to the door. For metal doors, use the #12 self-drilling screws provided (recommended driver speed 1,900-2,500 RPM). For wood doors, use optional #12 wood screws.
Hanging the Door:
1. Position the door (with hinge attached) at 90 degrees to the frame. Attach the hinge to the frame. For metal frames, use the #12 self-drilling screws provided (recommended driver speed 1,900-2,500 RPM). For wood frames, use optional #12 wood screws.
2. Make a gentle trial swing. Carefully check the door for proper swing and clearance.
Adjusting the Door:
1. If lateral adjustment of the door is required due to excessive or uneven door/frame clearance, adjust by shimming where needed:
a. For minor adjustments, an effective shimming material is 1 1/2" cloth duct tape. Apply the tape in steeped layers underneath the frame leaf where needed to build up to the desired thickness.
b. To shift the entire door, a thin continuous aluminum strip may be used underneath the frame leaf (available in 1/16" and 1/8" thicknesses from the manufacturer.)
2. Retighten all screws. Carefully check the door for proper swing and clearance.


