

Zero #321, Automatic Door Bottom, Surface Mounted Aluminum with Neoprene Seal, .5" Drop


This Zero International #321, regular duty, surface mounted automatic door bottom is fitted with a high quality, extruded neoprene seal insert, which effectively prevents the infiltration of light, sound, drafts, dirt, and smoke. Made with a high quality mechanism that has been successfully tested through 5 million cycles! Available in two anodized finishes. Length is custom cut to size.
Sizing: To determine length needed, see How to Measure for an Automatic Door Bottom.
How to Order: Selecting Finish and Exact Size required will determine your total price. Note, product is priced per range with 18.25"-36" being the lowest priced range.
See tabs below for additional information
This automatic door bottom has a unique sloped profile which prevents water and dirt from seeping behind the casing and will extend the life of the door and product.
Fitted with a high quality, durable, neoprene seal. Additional rubber in the interior of the casing contributes to the smooth operation of this model.
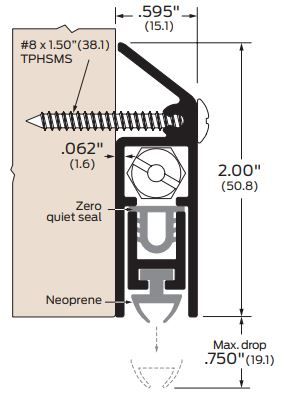
Optimum clearance between door bottom unit and floor or sill is .375”. Seal has a maximum effective drop of .5".
Handing: Product is handed. It is shipped at factory default handing and can be easily reversed in the field.
Installation: Surface mounted application for easy installation. Installation instructions and sheet metal screws are provided for installation. Screws are colored to coordinate with casing.
Sizing: To determine length needed, see How to Measure for an Automatic Door Bottom.
Please note, Images are for illustrative purposes only. They are not actual photos. Therefore, actual colors may vary slightly and size may be enlarged to show detail. See product specs for exact measurements.
This product has a 1 year guarantee against defects in material and workmanship.
Click to view our Full Warranty Policy.
For a fully mortised option, see our Zero International #323 Mortised Aluminum and Neoprene Automatic Door Bottom.
-
QuickShipNo
-
ManufacturerZero International
-
MPN321
- Product Design
-
Mounting TypeSurface Mounted
-
Door TypeWooden Door, Hollow Metal Door
-
- Dimensions
-
Casing DimensionsThe aluminum casing measures .595" wide, with a full height of 2". Made of .062" thick aluminum.
-
LengthCustom Cut to Size
-
Drop SizeUp to .5" Drop
-
- Installation
-
HandingRight Handed, Left Handed
-
Installation ScrewsInstallation Screws Provided
-
SizingTo determine sizing required see 'How to Size an Automatic Door Bottom'
-
- Special Features
-
Compatible Insert Replacement#320N Neoprene Insert
-
- Finishes
-
FinishClear Anodized Aluminum (US28), Dark Bronze Anodized Aluminum (313)
-
- Compliance Details
-
Compliance DetailsFire Rated, BHMA Certified
-
ANSI DesignationR3B3341
-
Warranty1 Year Limited Warranty
-
Automatic Door Bottoms utilize a concealed flat spring mechanism and plunger. When the door is closed, a brass plunger is compressed to automatically lower the seal, starting from the hinge side first. This motion ensures a smooth usage even on an uneven surface and prevents drag. The seal is automatically raised upon opening. These automatic door bottoms have been successfully tested through 5 million cycles!
See also About Automatic Door Bottoms.
Click here for a Printable Copy of How to Install an Automatic Door Bottom.
|
Automatic Door Bottoms are available with three mounting options: Surface Mounted, Semi-Mortised and Fully Mortised. A surface mounted application can be applied without removing the door from its hinges. For a semi-mortised, if the rabbet in the door is cut-out already, the door does not need to be removed. For a fully mortised application the door should be removed before starting. |
|
STEP 1: SIZING YOUR DOOR BOTTOM Once your door is ready for installation you need to determine the size required for your door bottom:
For visual presentation see How to Measure for an Automatic Door Bottom. |
|
Once you have determined the size needed, if necessary, trim your door bottom. Use a chop saw or table saw to create a perfectly straight cut. Note, Only trim opposite the actuating plunger, brass nut. (Trimming from the brass nut side will ruin your ADB).
|
|
|
|
STEP 2: PREP FOR ATTACHING AUTOMATIC DOOR BOTTOM
Place the automatic door bottom against the door Once you have the automatic door bottom leveled and positioned correctly, with a pencil or marker mark where the attachment screws need to be drilled. |
|
STEP 3: ATTACHING THE AUTOMATIC DOOR BOTTOM
To make installation easier you can drill a pilot hole which will ensure you attach the door bottom to the correctly marked spot. With the screws provided, screw in the automatic door bottom. In some models, a plate is provided for the hinge side of the frame. This will protect the door frame from getting worn down by the actuating plunger. If provided, attach to corresponding point on the frame. |
|
STEP 4: TESTING YOUR AUTOMATIC DOOR BOTTOM
|
|
Once you have followed through with all the instructions your Automatic Door Bottom is good to go! Enjoy years of quality sound, draft and light infiltration control with your new door bottom.
|


