

Zero #350 Automatic Door Bottom, Mortised with Neoprene Seal, .75" Drop


This Zero #350 Fully Mortised, Regular Duty Automatic Door Bottom creates a tight seal at the bottom of doors to prevent infiltration of sound, light, drafts and more. Fitted with a solid neoprene seal and high quality mechanism that has been successfully tested through 5 million cycles! This model is fire rated.
CLEARANCE ITEM- Available in 33" and 41.25" Length. For complete product with choice of custom sizes, see our Automatic Door Bottom, Mortised with Neoprene Seal.
NOTE: ONLY 2 OF EACH SIZE LEFT IN STOCK! Orders of more than 2 door bottoms from each size will not be honored.
See tabs below for additional information
CLEARANCE ITEM- Available in 33" and 41.25" Length. For complete product with custom sizing, see our Mortised Automatic Door Bottom with Neoprene Seal.
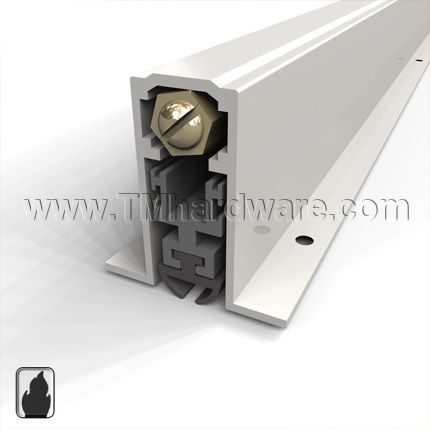
The fully mortised aspect of this automatic door bottom is great for high end designer doors and luxury hotels and condo units that prefer their doors maintain their clean unobtrusive look.
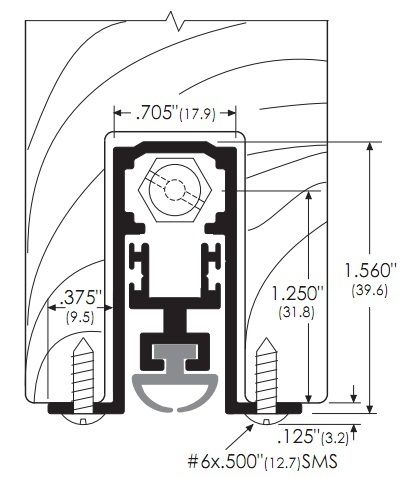
Dimensions: Casing measures 1.560" H by 1.45" total width. Body measures .705" in width. Compatible with doors of 1-3/4" thickness and above.
Suggested Door Cutout: 3/4" x 1-9/16"
Seal: Solid neoprene seal, self-extinguishing and oil resistant. Seal has a maximum drop of .75".
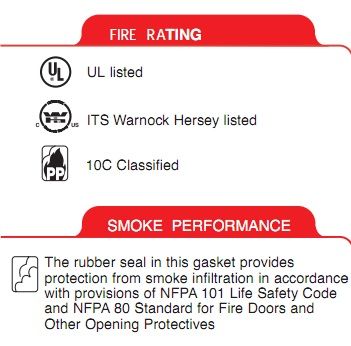
Compliance Details: Rated for Fire and is UL listed (see Product Data Tab for details.)
Handing: Compatible with both right and left handed doors.
Installation: Fully mortised aluminum casing. Installation instructions and screws provided.
Additional Options - Light Spring Strength: Light Spring Strength requires less operating force to activate than standard Strength. Light Spring is compatible with ADA Compliant Doors and can be easily used by those with limited mobility. Can also be applied to sliding doors. Casing dimensions remain the same. Contact us at 845-388-1300 to purchase.
Sizing: To determine sizing, see How To Measure For An Automatic Door Bottom.
Please note, images are for illustrative purposes only. They are not actual photos. Therefore, actual colors may vary slightly and size many be enlarged to show detail. See product specs for exact measurements.
This product is guaranteed for 1 year against defects in material and workmanship.
Click to view our Full Warranty Policy.
Automatic Door Bottoms utilize a concealed flat spring mechanism and plunger. When the door is closed, a brass plunger is compressed to automatically lower the seal, starting from the hinge side first. This motion ensures a smooth usage even on an uneven surface and prevents drag. The seal is automatically raised upon opening. These automatic door bottoms have been successfully tested through 5 million cycles!
See also About Automatic Door Bottoms.
Click here for a Printable Copy of How to Install a Mortised Automatic Door Bottom.
|
Automatic Door Bottoms are available with three mounting options: Surface Mounted, Semi-Mortised and Fully Mortised. A surface mounted application can be applied without removing the door from its hinges. For a semi-mortised, if the rabbet in the door is cut-out already, the door does not need to be removed. For a fully mortised application the door should be removed before starting. |
|
STEP 1: PREPARE YOUR DOOR BOTTOM
Remove door and cut mortise in bottom of door as per the dimensions of the provided product specs. NOTE: If a door is fire labeled or of special construction, mortise preparation must be done by the door manufacturer. |
|
STEP 2: MEASURE AND TRIM YOUR DOOR BOTTOM
Measure your door from side to side. That will determine the length required for your Door Bottom. |
|
Once you have you determine the size needed, if necessary, trim your door bottom. Use a chop saw or table saw to create a perfectly straight cut. Note, Only trim opposite the actuating plunger, brass nut. (Trimming from the brass nut side will ruin your ADB). You can trim from the edge up to one inch of the screw on the side wall of the ADB. |
|
STEP 3: APPLY YOUR AUTOMATIC DOOR BOTTOM
With door removed from opening, install the door bottom with plunger at the hinge side, fasten with screws provided and install door in opening. |
|
STEP 4: ADJUSTING YOUR AUTOMATIC DOOR BOTTOM
Screw the actuating plunger in or out as required until the gasketing just touches the sealing surface when the door is closed. It is not necessary to squash the gasket to provide an effective seal. |
|
Once you have followed through with all the instructions your Automatic Door Bottom is good to go! Enjoy years of quality sound, draft and light infiltration control with your new door bottom. |
.jpg "How to Install an Automatic Door Bottom- Figure 1")
.jpg "How to Install an Automatic Door Bottom- Figure 1")
.jpg "How to Install an Automatic Door Bottom- Figure 1")
.jpg "How to Install an Automatic Door Bottom- Figure 1")
.jpg "How to Install an Automatic Door Bottom- Figure 1")


