

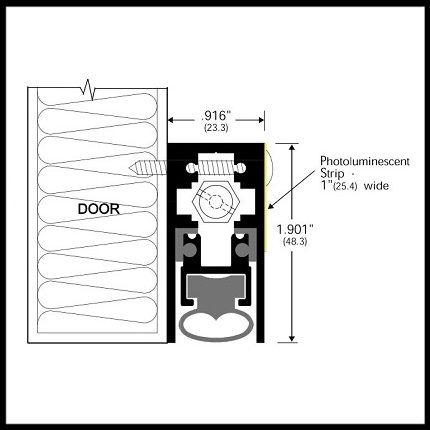
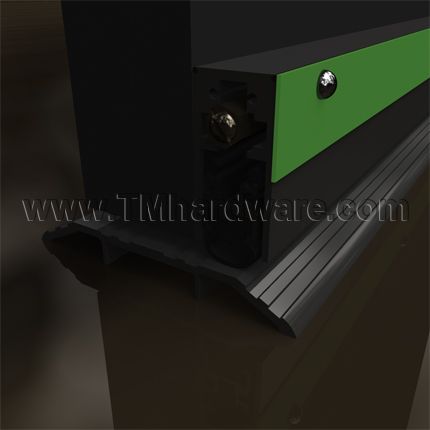
Automatic Door Bottom, Surface Mounted, Heavy Duty, Neoprene Seal with Marking Strip, 1" Drop


This product has been discontinued. To view without photoluminescent strip see:
See tabs below for additional information
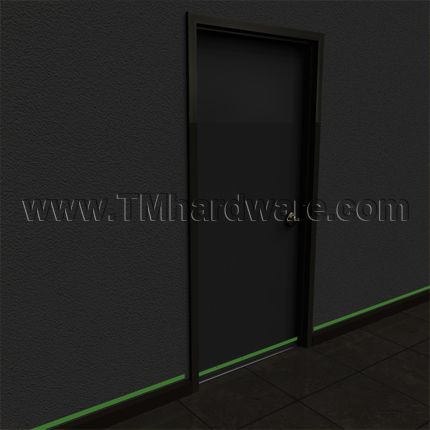
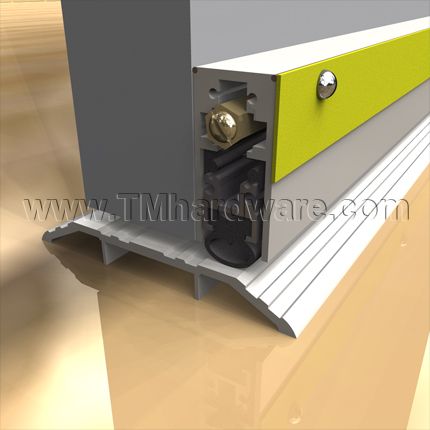
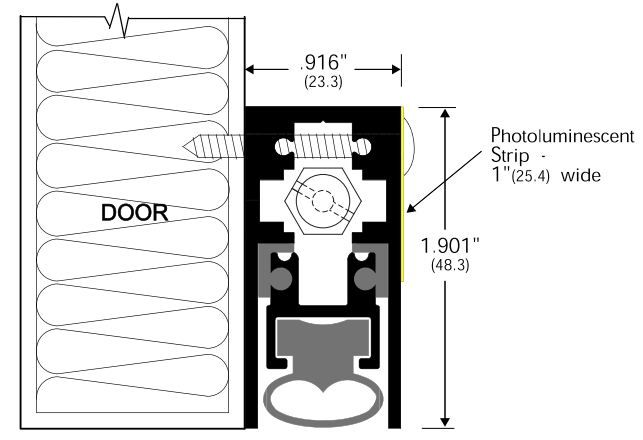
Photoluminescent Markings: The surfaces of the automatic door bottom is covered in a photoluminescent strip which facilitate safe emergency exists when power systems have failed. They are designed for compliance with Building Code Standards RS 6-1/1A of New York City Building Code Section 27-383(b) for photoluminescent exit path marking adopted in May 2005, for both new construction and renovation.
The photoluminescent material is charged by exposure to ambient light and admits luminescent after the activating light source is no longer available. Made with top grade strontium pigments, the material in the system is non-electric, non-toxic and non-radioactive. It is designed for easy maintenance and maximum durability.
Dimensions: Casing measures 1.901" x .916" and is made of .083" thick aluminum.
Finishes: Available in Clear Anodized Aluminum
Seal: Casing is fitted with solid neoprene bulb seal with a maximum drop of 1". It can be used directly above the floor, or with a Doorway Threshold.
Compliance Details: Rated for fire and smoke (see product data tab for more information).
Handing: Please select handing required in options above. To determine handing required, see How to Determine Door Handing / Swing.
Installation: Model is designed to be surface mounted. Installation instructions and screws provided.
Sizing: To determine sizing see How to Measure for Automatic Door Bottom.
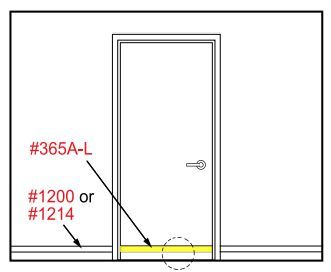
Additional Options - Photoluminescent strip and Automatic Door Bottom can be purchased separately, see our Photoluminescent Stairway Marking, 1"-2" Adhesive Strip and Automatic Door Bottom, Neoprene Bulb Surface Mounted.
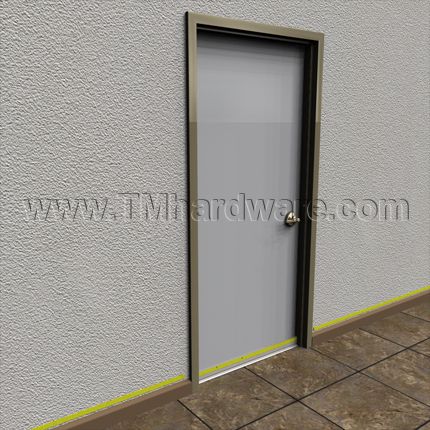
Please note, images are for illustrative purposes only. They are not actual photos. Therefore, actual colors may vary slightly and size may be enlarged to show detail. See product specs for exact measurements.
This product has a 3 year guarantee against defects in material and workmanship.
Click to view our Full Warranty Policy.
Click to view all our Photoluminescent Markings
-
QuickShipNo
-
ManufacturerZero International
-
MPN365A-L
-
HandingRight Handed, Left Handed
- Finishes
-
FinishFlat Black (US19)
-
- Compliance Details
-
Warranty5 Year Limited Warranty
-
|
How it Works |
|
Automatic Door Bottoms utilize a concealed flat spring mechanism and plunger. When the door is closed, a brass plunger is compressed to automatically lower the seal, starting from the hinge side first. This motion ensures a smooth usage even on an uneven surface and prevents drag. The seal is automatically raised upon opening. These automatic door bottoms have been successfully tested through 5 million cycles! See also About Automatic Door Bottoms. |
|
Product Specs |
|
|
|
Compliance Details |
|
|

Click here for a Printable Copy of How to Install an Automatic Door Bottom.
|
Automatic Door Bottoms are available with three mounting options: Surface Mounted, Semi-Mortised and Fully Mortised. A surface mounted application can be applied without removing the door from its hinges. For a semi-mortised, if the rabbet in the door is cut-out already, the door does not need to be removed. For a fully mortised application the door should be removed before starting. |
|
STEP 1: SIZING YOUR DOOR BOTTOM Once your door is ready for installation you need to determine the size required for your door bottom:
For visual presentation see How to Measure for an Automatic Door Bottom. |
|
Once you have determined the size needed, if necessary, trim your door bottom. Use a chop saw or table saw to create a perfectly straight cut. Note, Only trim opposite the actuating plunger, brass nut. (Trimming from the brass nut side will ruin your ADB).
|
|
|
|
STEP 2: PREP FOR ATTACHING AUTOMATIC DOOR BOTTOM
Place the automatic door bottom against the door Once you have the automatic door bottom leveled and positioned correctly, with a pencil or marker mark where the attachment screws need to be drilled. |
|
STEP 3: ATTACHING THE AUTOMATIC DOOR BOTTOM
To make installation easier you can drill a pilot hole which will ensure you attach the door bottom to the correctly marked spot. With the screws provided, screw in the automatic door bottom. In some models, a plate is provided for the hinge side of the frame. This will protect the door frame from getting worn down by the actuating plunger. If provided, attach to corresponding point on the frame. |
|
STEP 4: TESTING YOUR AUTOMATIC DOOR BOTTOM
|
|
Once you have followed through with all the instructions your Automatic Door Bottom is good to go! Enjoy years of quality sound, draft and light infiltration control with your new door bottom.
|


